
A small opening beside a service hatch can deserve attention before a large, slightly sagging panel. An obvious tear is easy to report. An access opening left unsecured can be easier to overlook. This bird netting maintenance checklist for warehouses puts those less obvious entry points into a repeatable inspection route.
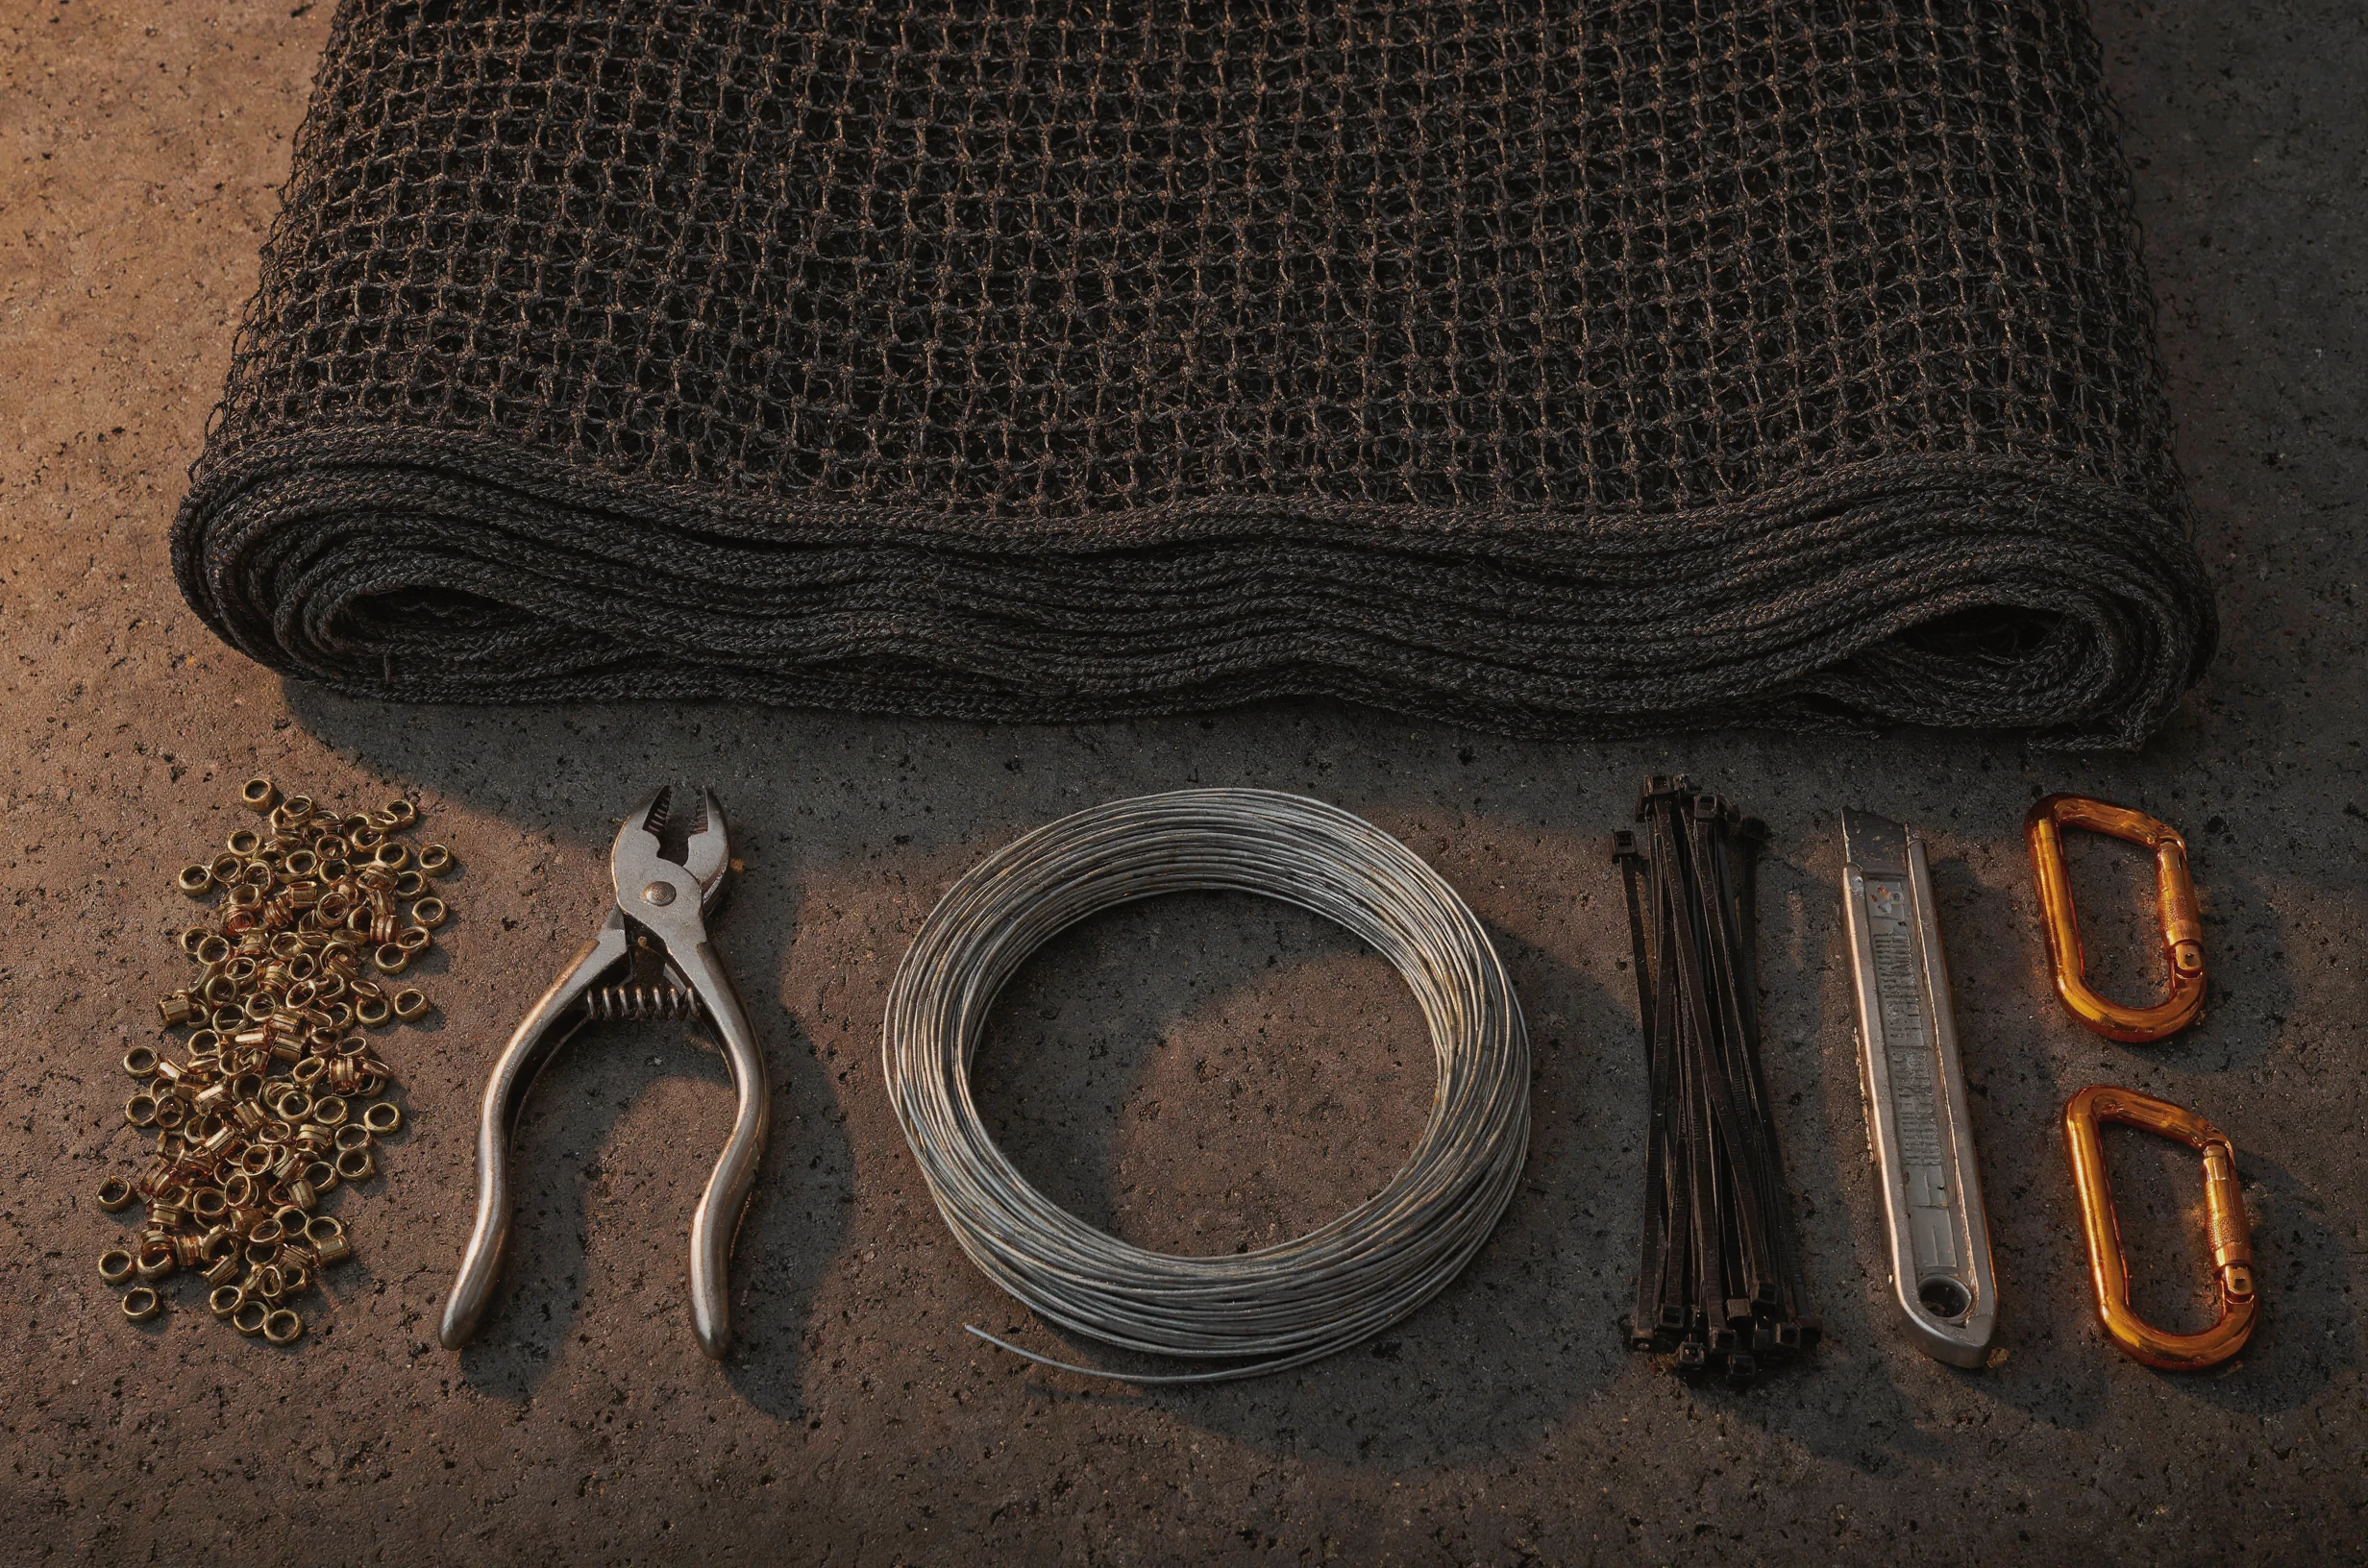
Bird netting forms a barrier around spaces birds might enter. Here, the six zones are parts of that installation: access closures, boundary cables, tension fittings, attachment rings, mesh panels and canopy edges. Checking each separately helps a facilities team describe exactly what needs attention.
I’d begin with access closures because their open or closed condition is relatively straightforward to establish. Then follow the supports and attachments before examining the wider panels and loading-bay canopy. This is an inspection order; a trapped bird or loose overhead fitting takes priority wherever you find it.
For every zone, record what you can see, what you cannot inspect safely and who owns the follow-up. A photograph from the warehouse floor can support a report, but concealed fittings may still need a closer specialist inspection.
Build a repeatable route around the warehouse
A warehouse netting inspection needs consistent locations so another person can find the same defect. Divide the installation using existing bay numbers, doors, columns or maintenance drawing references. “Gap above loading door three” is useful. “Netting damaged outside” leaves the repair team guessing.
Gather the installation drawing, handover photographs and maintenance instructions where available. These give you something to compare against, particularly around deliberately shaped panels and service openings. Record missing documents as an information gap; avoid guessing the original fixing arrangement.
Keep the routine route within areas staff can reach safely. Use suitable viewing equipment from an authorised position where needed. Reaching from racking, pallets or a forklift creates a separate access problem. Arrange closer inspection through the site’s normal work-at-height process.
At each location, capture:
- An overview showing the bay and surrounding structure.
- A closer photograph of the suspected defect.
- Any bird activity, droppings or nesting material nearby.
- Anything that prevented a complete inspection.
Record the date, inspector and relevant events, such as recent roof work or a reported vehicle strike. Existing pest monitoring records can hold these findings alongside other site observations.
Before setting off, identify who receives urgent findings. The person walking the route should know how to report a live bird behind the barrier or a fitting that appears liable to fall.
1. Access zips beside lights and services
Access zips are closures fitted into netting so maintenance staff can reach lights, equipment or building services. They earn first place because an opening can often be checked directly, and service work gives you a clear event to investigate.
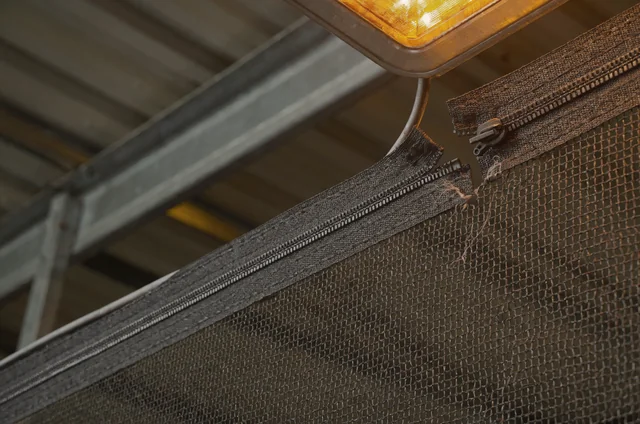
Find every recorded access point. Check that each zip is closed along its full length, including its ends. Look at the surrounding stitching and the connection between the zip assembly and the net. A closed slider alone does not establish that the whole opening is secure.
Check for three visible problems:
- Separated teeth or an opening behind the slider.
- Torn stitching around the closure.
- Cables or equipment holding part of the opening apart.
Ask whether anyone has recently worked through that access point. A lighting repair or service visit may explain a changed closure without identifying damage elsewhere. Add the contractor’s work reference to the inspection record when available.
Avoid forcing a stiff zip or pulling on the surrounding net to bring the edges together. If authorised staff can operate it safely, follow the installation instructions. Otherwise, record the fault for the netting contractor.
Before closing an opening, establish whether birds are inside the protected space. If that is uncertain, arrange an assessment before altering the barrier.
Give this zone a satisfactory status only when the closure and its surrounding attachment are visibly complete. Where the upper end is hidden from view, record that limitation and arrange the missing check.
2. Perimeter wires along walls and beams
The perimeter wire is the boundary cable supporting the edge of the net. Check it next because it defines where the barrier meets the warehouse structure.
Trace the whole visible boundary rather than looking only at the centre of each panel. Follow wall junctions, beam edges and changes in direction. Pay particular attention to corners and places where roofing, cladding or signage work has taken place.
Look for a cable that has moved from its recorded position, a new gap beside the building or a fixing pulling away. An anchor is the fitting that attaches the support system to the structure. Photograph the anchor and the surrounding wall or steelwork together.
Record whether:
- The cable follows its intended route.
- The net edge remains attached along that route.
- Any anchor or nearby building material appears damaged.
Keep the observation precise. “Visible separation beside column B4” gives a contractor a starting point. “Wire needs tightening” assumes a remedy before the cause has been assessed.
I would avoid judging tension by pressing or pulling on the cable during a routine visual round. Ask the competent installer to compare it with the installation specification where adjustment may be needed.
A changed boundary needs an assigned inspection or repair action, even if birds have not yet been seen nearby. If part of the perimeter is concealed by stored goods, arrange a suitable viewing position before marking that section complete.
3. Turnbuckles at corners and cable ends
A turnbuckle is a threaded fitting used to adjust cable tension. Once you have traced the boundary, examine these fittings and their connections to the surrounding system.
Compare their visible position with handover photographs or the last satisfactory inspection. Look for a fitting that appears bent, disconnected, displaced or visibly changed. Include the cable ends and nearby anchors in the photograph, since an isolated close-up may hide the wider problem.
Check whether the fitting is accessible for proper assessment. A turnbuckle behind a duct or above a busy loading lane may need planned access and a controlled work area. Record that requirement so the repair does not stall after someone arrives without suitable equipment.
The tempting response to a loose-looking panel is to turn the nearest adjuster. Leave adjustment to someone working from the system’s specified arrangement. The site needs the cause assessed before the tension is changed.
Ask the repair contractor to confirm:
- Whether the fitting and its end connections remain suitable.
- Whether the support cable needs adjustment.
- Whether movement elsewhere requires a separate repair.
Avoid setting a generic number of turns or a target tension from an online checklist. Those details belong in the installation instructions and the contractor’s repair plan.
A turnbuckle with uncertain condition should remain an open inspection item. Close it after the fitting, cable and attachments have been assessed together, with the outcome entered against the original location reference.
4. Hog rings along intermediate supports
Hog rings are small metal loops that fasten netting to support wires. Intermediate supports run between the outer boundaries of an installation. Check their attachment points after the larger support components so you can trace any separation accurately.
Follow each visible attachment line. Look for missing or open rings, netting detached from the wire and strands pulled out around a fastening. Include joins between adjoining net sections where those joins form part of the installation.
A ring count alone tells you little about the surrounding net. Examine whether each visible fastening still holds the intended material. Conversely, a gap in an attachment line needs comparison with the specified arrangement before anyone declares that a particular number of rings is missing.
Photograph a suspected defect alongside the neighbouring intact section. This gives the contractor a useful comparison and helps show how far the separation extends.
Avoid bridging a gap with spare wire, string or improvised loops during the inspection. Record any existing temporary repair, including who installed it if known. Ask the competent contractor to assess its suitability and identify the permanent work required.
Where the net has separated over several attachment points, mark the full affected length on the inspection drawing. Keep the description observational: “edge detached between these two supports” is clearer than diagnosing a fastening failure from the floor.
This zone is complete when the visible attachment line has been checked and any inaccessible stretches have a named follow-up action.
5. Mesh panels around pipes and roof steel
The mesh is the net’s grid of strands and openings. Inspect the panels after their supports and attachments so a visible dip or distorted area has some surrounding context.
Look across each panel from more than one safe viewing position where possible. Trace seams, repaired areas and the edges of pipes, ducts or roof steel passing through the barrier. These junctions deserve their own photographs because the surrounding structure can obscure an opening.
Record torn strands, holes, detached seams and material caught against the net. Compare suspected changes with earlier photographs. Describe where the defect sits and its visible extent without stretching the panel to measure it.
A slightly uneven panel needs assessment against the intended installation. Its appearance alone does not tell a facilities team how much tension to apply. Give greater attention to identifiable openings, detached material and evidence that birds are getting behind the barrier.
Keep sightings and droppings observations beside the physical defect report. Background on pigeon droppings health risks can support the separate cleaning assessment. Arrange that work through the site’s established procedures.
Avoid poking a suspected hole with a pole or cutting away a loose section to improve the view. Refer concealed damage for suitable close inspection.
For this zone, the practical decision is whether the panel remains continuous around its seams and penetrations. Record doubtful areas individually, with a photograph and an owner for assessment.
6. Canopy overhangs above loading bays
A canopy overhang is the roofed area projecting beyond the warehouse wall, often above loading bays. Finish here by checking how the netting meets the canopy’s outer edges and the building behind it.
View the installation from authorised positions along the loading area. A panel that appears continuous from directly below may have an obscured edge when viewed against a beam. Record the viewing positions used and any parts hidden by vehicles or equipment.
Look around:
- The ends of the canopy and its junction with the wall.
- Corners where the net changes direction.
- Door gear, lights and services beside the barrier.
- Locations affected by recent building or vehicle work.
An edge return is the part of the barrier that turns around a corner or closes an end. Follow each visible return to its attachment point. Record any opening between it and the surrounding structure.
Coordinate the check with loading operations. Inspectors need a suitable position without stepping into vehicle routes or standing beneath suspected loose components. Arrange a different inspection window if normal operations prevent a useful view.
Where droppings require attention, put commercial roof guano cleanup into the work plan alongside the netting assessment, with separate responsibilities.
End this zone by recording whether every canopy edge was visible. A blocked view remains an inspection task; assign a date and owner for checking it when access is available.
Keep each netting defect open until it is checked
A warehouse inspection record needs to show what happened after a defect was reported. Use a consistent status for each finding, such as satisfactory, further inspection needed, repair required or urgent restriction in place. Define those statuses within the site’s maintenance process.
For every open item, record the exact location, photographs, observed condition and access restrictions. Add a responsible person and a target date appropriate to the finding. Separate a contractor’s proposed attendance date from the date the work was completed.
After repair, compare the result with the original report. Photograph the same location and record what was changed. Include any limits on the completion check, such as a concealed anchor awaiting closer inspection.
A simple digital checklist could require a zone reference, photograph, repair owner and completion evidence before allowing a defect to be closed. It could also keep inaccessible areas visible on the outstanding-work list.
Include an explicit handover when shifts change. If one team reports a bird sighting and another arranges netting work, both records should point to the same bay or defect reference.
When choosing a repair contractor, check relevant experience, the proposed access arrangements and pest controller credentials. Ask for a written scope tied to the recorded faults. Keep the item open until the agreed repair and completion check are both documented.
Decisions after a warehouse netting check
The inspection should leave the warehouse team with clear actions. These questions help resolve the points that a visual checklist cannot settle on its own.
How often should the netting be inspected?
Use the installer’s maintenance instructions and the site’s risk assessment to set the planned interval. Record the chosen schedule and the person responsible for arranging it.
Add checks after events that could affect the installation, including roof repairs, service access, reported impacts or visible storm damage. A new bird sighting behind the barrier also deserves a fresh assessment.
If no inspection schedule exists, make establishing one a maintenance action. Avoid adopting an interval simply because another warehouse uses it.
Does a sagging panel always need tightening?
Ask for the panel to be compared with its intended shape and support arrangement before adjustment. Record whether the dip is new, whether the edge remains attached and whether there is an identifiable opening.
Photographs from the same position help show change. A contractor can then assess the supports, fittings and net together.
Avoid writing “tighten net” as the whole job description. State the visible condition and ask for the cause and appropriate repair to be confirmed.
What if there is a bird or nest behind the net?
Stop the affected maintenance task and keep people away from the immediate work area as appropriate. Refer the situation to a competent bird-control specialist before closing openings, cutting material or moving nesting material.
Describe what you can see from a safe position, including the bird’s location and whether it appears trapped. Avoid assuming that an apparently quiet space is empty.
The separate guidance on bird nest removal considerations can help frame that discussion. Have the specialist assess the situation before the barrier is altered.
Can the warehouse team make a small repair?
That depends on the task, staff competence, safe access and the installation instructions. An authorised person operating a reachable access closure is a different task from replacing fittings above a loading bay.
Describe the proposed work before assigning it. Confirm who can carry it out and how completion will be checked.
If a temporary measure is proposed, give it an owner and a review date. Keep the underlying defect visible in the maintenance record until the permanent arrangement has been assessed and accepted.
Who owns the repair in a leased warehouse?
Check the lease, maintenance agreement and contractor scope to establish who handles the building, the netting and its upkeep. Record the agreed responsibilities so future reports reach the right person.
While responsibility is being clarified, assign someone to manage the finding and any immediate site restrictions. Keep operations staff informed about affected loading areas, stock locations or access routes.
Act on an unsecured access zip today: establish whether birds are behind the barrier, then arrange safe closure or specialist assessment. A modest panel dip is the finding I would avoid overreacting to. Photograph it, compare it with the installation record and have its condition assessed before anyone changes the tension.
Need professional help? BuzzKill offers fast, reliable pest control services across London and Essex.